|


 forgot
your password? forgot
your password?


|

Improving
capture performance in Movie Maker 2
Last
updated 6-10-03
Capturing video onto your computer’s hard drive can be
frustrating. That’s because digital video from your camcorder is
very large (a single minute takes up 200 megs of space) and not every
system can handle the sustained capture speeds needed to transfer your
movie over a firewire cable and onto a hard drive.
Fortunately, if you are running Movie Maker 2 then you already have Windows
XP installed on your computer. Most computers that come bundled with Windows
XP are already powerful enough to capture, even if they have slow processor
speeds. For example, I commonly capture and edit video on my 600mhz laptop
XP computer and never run into any problems with video capture.
However, if you do run into problems during capturing, there
are several things you can do to speed up your system:
- Defragment your
hard drives
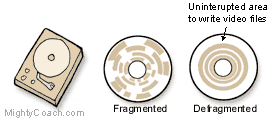
Defragmenting a drive is an easy performance enhancer, and you should
defragment regularly. You see, a hard drive is really a circular platter
(kind of like a CD). Data is written onto this platter in a circular
pattern, and each hard drive platter can only hold a set amount of data.
Data is constantly written and erased throughout this entire platter,
and any single file may be broken up into many little sectors throughout
the disk. This isn’t normally a problem, though it can slow your
system down over time as it takes longer to find and open files.

However, this can be a major problem with large video files, as these
files will have to be split into smaller fragments as they are being
written, and this slow-down can make your drive prone to dropped frames.
When you defragment your drive, all the broken fragments are placed
together, so that your hard drive has a large "physical area"
of available space to write your video to.
- Get a faster hard
drive
The main hurdle to capturing big video files is the speed of your hard
drive. You see, when you stream video onto your computer through a firewire
cable, the digital video is written onto your hard drive as large a
DV-AVI file. This stream runs at a constant 200 megs per minute and
if your hard drive slows down while this stream is running, you will
loose some of your video and get “dropped frames”. These
dropped video frames are bad, as all the video after that will be out
of sync.
While most hard drives run very fast, some are faster than others, and
they do slow down at times. To avoid hard drive “hiccups”
you should close down any background programs, and you may need to invest
in a faster 7200 rpm hard drive.
- Partition your Drive
as NTFS
If your hard drive shipped with Windows XP, is should already be partitioned
as NTFS. To check, find your drive inside of “My computer”
and right-click on it with your mouse. If your drive is partitioned
in the older Fat16 or Fat32 format, than this is your most likely culprit
for capture problems. The older partition structure isn’t optimized
for video capture, and won’t let you capture video files over
a certain size (2 or 4 gigs).
- Get a second hard
drive
You can greatly improve your editing system by adding another hard drive
that is used solely for video capture, and most professional editors
have systems with many drives. This way, your computer can use your
main drive to handle running programs, and the second drive strictly
for video capture. If you do a lot of editing, you’ll need another
drive anyway, as your videos will quickly fill up all your available
storage space.
- Use the Windows
Media Codec
If you can’t get rid of dropped frames when capturing in the DV-AVI
format, you can always try capturing in MovieMaker’s WMV9 codec.
Because this format generates small file sizes, you are not going to
run into dropped frames from an underperforming hard drive. However,
the compression itself might be tasking on your CPU because encoding
video takes a lot of processing power. Most of the time, you can capture
video at the highest setting (high quality 720x480) without any problems.
-
 Turn
your preview monitor off Turn
your preview monitor off
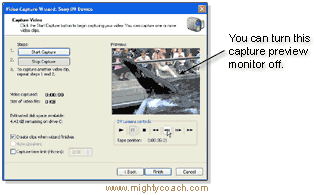
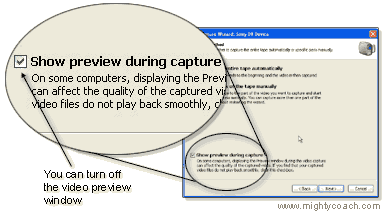
When you capture video, you can watch the video capture on your computer
inside Movie Maker’s preview monitor. However, generating this
“preview video” is tasking on your system and it really
isn’t necessary as you can watch your captured video directly
on your camcorder’s LCD screen. You can turn the preview mode
off inside the capture wizard.

- Decrease your monitor
display settings
Try setting your display to a lower resolution (1024 x 768 is Movie
Maker’s minimum recommendation but you can go lower if you need
to) and decrease your color depth to 16 million (or “high color”).
As you can see, there are many things you can do to tweak your system
for maximum performance and some are cheaper than others. Fortunately,
once you get your video onto your computer, you are pretty much home free
as it doesn’t take a lot of processing power to actually edit the
video.
Next: The
correct way to save your projects
Or: See all our Movie Maker 2 articles
and tips!
 |
 |
 |
Go right ahead! You can even copy and
use the pictures. We only ask that you include the following sentence
(and link) at the bottom of the article: |
| You can find
more useful home-video "tips and tricks" like this one at
www.mightycoach.com
- they even have an online-video course that teaches you to edit video
on your home computer! |
|
|


