Changing
the Image's Properties
The
following article is a transcript from a our video product, "Intro
to Powerpoint XP."
After inserting a photo or picture into our PowerPoint slide,
there are many things we can do to make it look better. We can rotate
and flip the image, crop it, and even adjust the brightness. PowerPoint’s
image manipulation abilities are impressive … you no longer need
to edit your graphics with photo-software, as you can simply paste the
flawed picture into your slide and fix it there.
Slide Properties
Panel
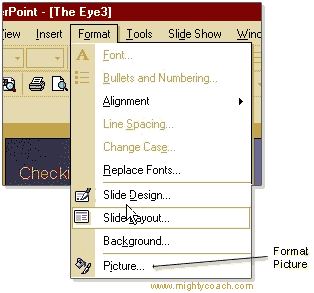
To change the formatting of a picture, first mouse-click on the picture
to select it. Then, go up to the menu bar and select [Format – Picture].
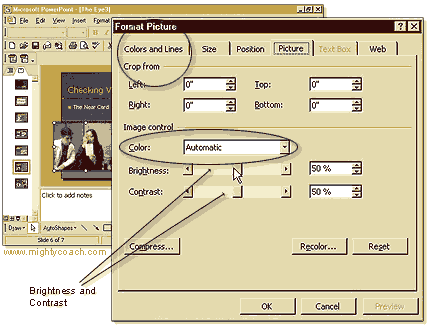
A pop-up box will appear that gives you many options for your photo. The
most useful ones include:
 1.
Brightness/Contrast: Make your picture brighter by adjusting
the brightness/contrast sliders and hitting preview. This is great for
dark photographs. 1.
Brightness/Contrast: Make your picture brighter by adjusting
the brightness/contrast sliders and hitting preview. This is great for
dark photographs.
2. Color: This pop-down box allows you to transform
your photo into to black and white. You can even “washout”
the picture and use it for a slide background picture.
3. Colors and Lines Tab: Lets you add a black borders
around your picture. This looks very nice.

There are many other functions you can adjust through this format box,
but most of them are easier to accomplish other ways. For example, it’s
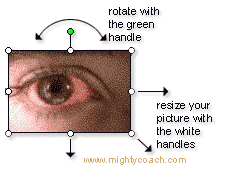
easier to adjust your picture size by grabbing the pictures “corner
handles.” If you hold down the [shift] key while resizing, the picture
will maintain correct proportions!

Rotating
Images:
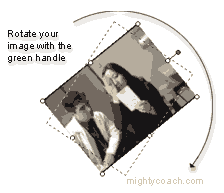
 Here’s a fun trick. You can rotate images in PowerPoint 2002 …
it’s really easy! First, select the picture by clicking on it. If
you look closely, you’ll see that the picture has a small green
handle (the little green circle). You can grab this rotation handle and
spin your photo in circles. Fun, huh? If you need to precisely align your
photo (such as when you need an exact 90 degree rotation) you can hold
the [shift] key down while rotating and the image will spin in set increments.
Next: Adding
text labels onto our pictures ...
Or: See all our PowerPoint tutorials!
 |
 |
 |
Go right ahead! You can even copy and
use the pictures. We only ask that you include the following sentence
(and link) at the bottom of the article: |
| You can find
more useful PowerPoint tips-and-tricks like this one at www.mightycoach.com
- they even have an online-video course that teaches you to use PowerPoint
in only a few hours! |
|


