|


 forgot
your password? forgot
your password?


|

Taking
video snapshots in Movie Maker 2.0
Last
updated 6-11-03
Movie Maker comes with a really nifty feature … the program
lets you take “snapshots” directly from your movie! This means
you can go to any point within a video clip, capture a freeze frame picture,
and save this image to your computer’s hard drive.
There are many uses for these snapshots …
- You could e-mail “hi-light pictures” of your video to
friends and family. Not everyone can receive or view wmv videos, so
these pictures are a great alternative (and they don’t take as
long to download).
- You can use the snapshot feature to transform your camcorder into
a low-resolution “digital camera.” Simply point your camcorder
at your subject and later you can go through your video and take virtual
snapshots directly off the captured video. I don’t have a digital
camera so I use this method to take pictures of items I sell on EBay
… while the resulting pictures aren’t good enough for printing,
they are fine for webpages.
- You can also use these video pictures to create title slides. I like
to find an interesting video scene that seems to “symbolize my
movie” and capture a snapshot of it. Then, I’ll import this
picture back into my project and turn it into a “title picture”
by adding an introductory title animation on top of it. You could also
add a title directly to the picture using a photo-editing program.
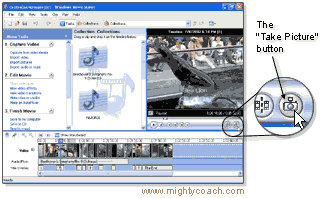
The actual process of taking these snapshot is quite easy. While viewing
a video clip in the preview monitor, pause the clip at an appropriate
spot, and click the “Take Picture” button under the preview
monitor. Movie Maker 2 will then ask you where you’d like to save
the picture. By default, Movie Maker will try to save your picture in
your “My Pictures” directory. If you plan on actually using
this picture in your current project, I recommend saving the picture into
your project’s own directory. This will keep everything organized
and keep all your projects files together where you can find them. (you
can find out more about this organization structure in this
article)

If you run into problems capturing pictures this way, this may occur
because you don’t you’re your hardware acceleration turned
on. You can check this by going into your display settings, clicking on
the troubleshoot tab, and setting your acceleration all the way up.
Next: Make
your own video slideshow
Or: See all our Movie Maker 2 articles
and tips!
 |
 |
 |
Go right ahead! You can even copy and
use the pictures. We only ask that you include the following sentence
(and link) at the bottom of the article: |
| You can find
more useful home-video "tips and tricks" like this one at
www.mightycoach.com
- they even have an online-video course that teaches you to edit video
on your home computer! |
|
|


