|


 forgot
your password? forgot
your password?


|

Video
effects in Movie Maker 2 ... which ones are actually useful, and how to
apply them.
Last
updated 6-10-03
Movie maker 2 comes preinstalled with a number of video effects
that you can add to your movie clips. These effects are numerous and easy
to apply. Despite the large assortment of effects, you’ll find yourself
using certain effects more often, and some of them not at all. Here are
some of the most useful effects and some uses you might not have though
of.
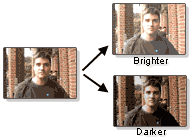
- Brightness Increase
and Decrease
These brightness effects are very useful for fixing your video’s
exposure levels. If you filmed an indoor scene that looks too dark,
you can simply brighten the video with the brightness effect. If your
video still isn’t bright enough, you can repeat the effect several
times until you get the look you want.

-
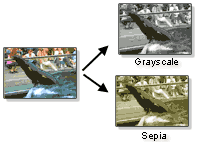
 Grayscale
and Sepia Tone Grayscale
and Sepia Tone
Both of these effects remove the color from your film, and the sepia
effect gives your film a pleasant “yellowed old photograph”
look. You can use these desaturating effects to make your movie look
classy (like those black and white DeBeer’s diamond commercials)
or to create a “flashback” or “dream sequence”
scene within a larger home movie epic.
-
 Rotation
effects Rotation
effects
There are several rotation effects, but they are not useful for video.
However, they work great for photographs, and allow you to align your
photos properly. If you hold your digital camera sideways (to get those
full-body pictures) these rotation effects allow you to rotate your
pictures in the proper direction so you can create “video slideshows”
of your picture collections.
- Slow down and speed
up
These two effects can be useful for creating comedy “movies.”
For example, you could make a fake
kung-fu movie with your kids and use the speed-up effect to create
rapid-motion fighting scenes. Likewise, the slow-down effect could be
used to create the clichéd “slow motion punch” that
is common in American action movies. You could also use the speed up
effect to make funny slapstick comedies … like the British “Benny
Hill” skits.
There are many other effects available within MovieMaker, though they
aren’t as useful as the ones mentioned here. Some of the effects,
like the artistic watercolor effects, seem to be included simply for the
“wow” factor. One effect that Movie Maker is sorely missing
is the “reverse video” effect, which is unfortunate as there
are many special effects you can perform by reversing film.
How to apply effects
To apply effects to your film you need to open up the Video Effects collection.
You can preview each effect in the preview monitor by double clicking
on the effect thumbnail. To apply the effect to a video clip, simply grab
the effect and drop it onto the clip in the storyboard.
Another way to apply effects is by right-clicking on the clip and choosing
“Video effects.” This mode allows you to see exactly what
effects are being used. This view is useful if you have to add or remove
multiple effects to your clip.
Next: Transition
between clips
Or: See all our Movie Maker 2 articles
and tips!
 |
 |
 |
Go right ahead! You can even copy and
use the pictures. We only ask that you include the following sentence
(and link) at the bottom of the article: |
| You can find
more useful home-video "tips and tricks" like this one at
www.mightycoach.com
- they even have an online-video course that teaches you to edit video
on your home computer! |
|
|


